
Friday, May 30, 2025

Wednesday, July 27, 2022

Python for Beginner
Python has been selected as one of the most popular programming language recently. Initially, Python has been introduced in 1984. It started to become one of the most popular programming language for data analytics and machine learning.
In this workshop, we will give you a very brief idea about python and some fundamental coding knowledge about python.
Presentation Slides:
Activities (Source Code) :
Tuesday, May 4, 2021
Induction Program - Scratch

Lecture 1 - Introduction to Scratch
Lecture 3 - Game Development 1
Lecture 4 - Game Development 2
Lecture 5 - Game Development 3
Friday, December 13, 2019
Web Page Design Workshop
Lecturer: Ms. Lim Sin Chee
Lab Assistant: Mr. Koong Kok Leong
Date: 13 Dec 2019
Venue: Lab 10
A first glance of the web page creation process. You will be able to explain how a web page is designed and displayed in a browser. This workshop contains a simple web animation making as well as interactive web page.
Template Download
Lab Assistant: Mr. Koong Kok Leong
Date: 13 Dec 2019
Venue: Lab 10
A first glance of the web page creation process. You will be able to explain how a web page is designed and displayed in a browser. This workshop contains a simple web animation making as well as interactive web page.
Template Download
Tuesday, August 13, 2019
Maze Game Development with Scratch
First City University College
Maze Game with Scratch

Topic: Maze Game Development with Scratch
Date: 28th August 2019 (Wednesday)Venue: Engineering Lab 7
Time: 1400 - 1600
Handout for ScratchTime: 1400 - 1600
Source for Game Development
Tuesday, June 18, 2019
Scratch Workshop
First City University College

Topic: Animated Name Card
Venue: Lab 10
Time: 1330 - 1530
Topic: Animated Greeting Card
Venue: Lab 10
Time: 1400 - 1600
Happy Birthday Song PDF Guide Book
Wednesday, December 12, 2018
Academic Poster 2018
A1 Poster: https://drive.google.com/file/d/1OizzTm0fxBVQ_22NNkBvDMQXY40NOrQn/view?usp=sharing
A2 Poster: https://drive.google.com/file/d/1l3L_nFFEKPt88NAA78OngiIP6crjjtJS/view?usp=sharing
A2 Poster: https://drive.google.com/file/d/1l3L_nFFEKPt88NAA78OngiIP6crjjtJS/view?usp=sharing
Friday, June 8, 2018
Blender 3D Game Development (Workshop for First City University College)
Blender 3D is an open source software for 3D animation as well as game development tool.
With a group of people contribute to the software, it give a chance of everyone who wanted to learn 3D animation or 3D game development.
In this workshop, I am going to demonstrate the power of Blender 3D of creating simple game without using coding skill. This game consists of two levels and player is going to locate the portal to next level of the game.
Organization Unit: First City University College
Faculty: Faculty of Engineering and Computing
Title: Blender 3D Game Development Workshop
Date: 10 June 2018
Duration: 8 hours
Agenda:
0930 - 1200 Workshop
1200 - 1300 Lunch Break
1300 - 1500 Game Development Competition
Guide Book for Download
With a group of people contribute to the software, it give a chance of everyone who wanted to learn 3D animation or 3D game development.
In this workshop, I am going to demonstrate the power of Blender 3D of creating simple game without using coding skill. This game consists of two levels and player is going to locate the portal to next level of the game.
Organization Unit: First City University College
Faculty: Faculty of Engineering and Computing
Title: Blender 3D Game Development Workshop
Date: 10 June 2018
Duration: 8 hours
Agenda:
0930 - 1200 Workshop
1200 - 1300 Lunch Break
1300 - 1500 Game Development Competition
Guide Book for Download
Wednesday, June 21, 2017
Simple Avoidance Game with Flash CS6 (Workshop for Firstcity University College)
Simple Avoidance Game with Flash CS6
This is a tutorial that will show you how to create a simple avoidance game using ActionScipt version 3 in Adobe Flash CS6. The following is the screen captured for the appearance of this game. There are only two characters in the game. Enemy will drop from the sky and the cute little jelly man is going to avoid the enemy. One mark will be granted if jelly man successfully avoid being hit by the enemy drop from the sky. In addition, any successful avoidance will increase the dropping speed of the enemy which create some difficulty to the game and enhance the playability of the game.

At the beginning of the game, we need to plan and organize the game. First of all, we need to define the goal of the game. The restriction of the game. The condition that will end the game. The highest mark will be granted to those who can avoid the enemy at the longest time.
Goal of the game: The jelly man has to avoid being hit by enemy as long as possible.
Restriction of the game: The jell man can move left or right (controlled by left and right keys beside the number pad). The enemy will randomly drop from the sky.
Condition Ending the game: If the jelly man is hit by the enemy the game end.
Then, design the background scene. Normally I will place ground at one layer, tree at one layer, sky at one layer, cloud at one layer, characters at one layer, mark at one layer and finally a layer for script.
We will create all necessary for the scene accordingly. Let's start with creating movieclips in Flash.
Creating Movie Clip
In the step, we need to create characters in the game (enemy and jelly man), NPCs (trees, ground, cloud and sky). We need to convert this image to movieclip in Flash and store in the Library so we can used them later in the game scene.Let use the Flash drawing tool to create the tree look similar to the following:



Create your cloud, sky and ground respectively at your own creativity.
Make characters and NPCs available in the scene
Place the characters and NPC to the respective layer as shown as the following: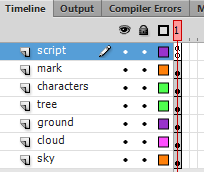
Drag one enemy to the stage. Give a name to this character so that the script can interact with it. In this case, named it enemy.
Drag one enemy to the stage. Give a name to this character so that the script can interact with it. In this case, named it hero.
Create a text box at the right upper corner and named it mark. Change the text to dynamic as it can be updated by the script.
Create the script section for the game
Select the script layer, press F9 to enter script editing window. Copy and paste the following code into the window.stage.addEventListener(KeyboardEvent.KEY_DOWN, pressedButton);
stage.addEventListener(Event.ENTER_FRAME, onEnter);
var score:Number = 0;
var enemy_speed:Number = 5;
var size:Number = 60;
var step:Number = 6;
function init():void{
enemy.x = size/2;
hero.x = size/2;
}
init();
function randomRange(minNum:Number, maxNum:Number):Number{
return (Math.floor(Math.random()*(maxNum-minNum))+minNum);
}
function onEnter(e:Event){
enemy.y = enemy.y + enemy_speed;
if(enemy.y > stage.stageHeight){
enemy.y = -size;
var num:Number = randomRange(0,step+1);
enemy.x = num*size+size/2;
score = score + 1;
mark.text = String(score);
if (stage.frameRate <= 60){
stage.frameRate = stage.frameRate + 5;
}else{
stage.frameRate = 60;
if(enemy_speed <= 25){
enemy_speed +=1;
}else{
enemy_speed += 25;
}
}
}
if(hero.hitTestObject(enemy)){
stage.removeEventListener(KeyboardEvent.KEY_DOWN, pressedButton);
stage.removeEventListener(Event.ENTER_FRAME, onEnter);
stage.frameRate = 24;
}
}
function pressedButton(event:KeyboardEvent) : void
{
if(event.keyCode == Keyboard.LEFT && hero.x >= size){
hero.x = hero.x - size;
}else if (event.keyCode == Keyboard.RIGHT && hero.x <= step*size-size){
hero.x = hero.x + size;
}
}
Play the game by pressing CTRL+ENTER.
The executable version of game is available in the link: https://www.dropbox.com/s/7i921ttldsab4dn/SimpleAvoidanceGame.swf?dl=0
The executable version of game is available in the link: https://www.dropbox.com/s/7i921ttldsab4dn/SimpleAvoidanceGame.swf?dl=0
Saturday, December 3, 2016
Tuesday, September 6, 2016
Condition Statement in PHP
Program is a set of instructions for computer to execute. It is important to tell the computer when to execute an instruction and when not to. Thus, the condition statement has become a very important code in programming language. A proper planned condition statement may make the computer execute "WISELY". An artificial intelligent nothing but a bunch of condition statement to help computer to decide the next move.Type of condition statement in PHP
- If (condition) { ….. }
- If (condition) { ….. } else { ….. }
- If (condition) { ….. } else if(condition) { ….. } else { ….. }
- switch (var) { case x: …..; break; case y: …..; break; }
If (condition) { ….. }
This is the simplest form of conditional statement. This statement will check whether the condition is TRUE to execute block of codes within the curly brace.
<?php
$age = $_POST['age'];
if($age>18){
echo "You are adult!";
}
}
?>
If (condition) { ….. } else { ….. }
This condition statement contain two possible states (TRUE or FALSE). This statement will check whether the condition is TRUE to execute the first block of code and otherwise execute the second block of code in the else block.
<?php
$age = $_POST['age'];
if($age>18){
echo "You are adult!";
}else{
echo "You are just a kid";
}
}else{
echo "You are just a kid";
}
?>
If (condition) { ….. } else if(condition) { ….. } else { ….. }
This condition statement contain multiple possible states. If the first condition is true, the first block of codes will be executed Otherwise, if second condition is met, the second block of codes will be executed.
<?php
$age = $_POST['age'];
if($age>0 and $age<=1){
echo "You are Infant!";
}else if($age>1 and $age<=3){
echo "You are toddler";
}else if($age>3 and $age<=18){
echo "You are child";
}else if($age>18){
echo "You are adult";
}
}else if($age>1 and $age<=3){
echo "You are toddler";
}else if($age>3 and $age<=18){
echo "You are child";
}else if($age>18){
echo "You are adult";
}
?>
switch (var) { case x: …..; break; case y: …..; break; }
This condition statement contain multiple possible states. If any of this condition is true, the case block of that particular code will be execute.
<?php
$menuOption = $_POST['option'];
switch($menuOption){
case 1: echo 'Show Record';
break;
case 2: echo 'Add Record';
break;
case 3: echo 'Delete Record';
break;
case 4: echo 'Update Record';
break;
default: echo 'Invalid Option';
break;
}
?>
Form and PHP code
Methods to send Form data
There are two methods to send user inputs to script:
POST method is a safer method as the inputs will be send by attaching to the trail of the HTTP protocol.
- GET
- POST
POST method is a safer method as the inputs will be send by attaching to the trail of the HTTP protocol.
Data passed from FORM
$_GET is an array contains values passed using GET method. Syntax: $_GET [name] where name is the name attribute of form element$_POST is an array contains values passed using POST method. Syntax: $_POST [name] where name is the name attribute of form element
Options to handling FORM with PHP:
- Separated form and PHP code.
- PHP code and form in a single PHP file
Separated form and PHP code.
The easiest way to handle user input is used separated form and script. In this case, you need to create a form in HTML file. And, in the action attribute specify the PHP file that handle input from this file.
form.html
<form action="process.php" method="get">
Age : <input type="text" name="age" />
<input type="submit" name="submit" />
</form>
process.php
<?php
echo $_GET['age'];
?>
form.html
<form action="process.php" method="get">
Age : <input type="text" name="age" />
<input type="submit" name="submit" />
</form>
process.php
<?php
echo $_GET['age'];
?>
PHP code and form in a single PHP file
In this option, the PHP file consists of two roles: display form and process the input. PHP file has to determined when to display a form and when to process the input. It is very critical as the PHP code cannot process the task if there is no data from the form. Thus, we need to check whether the user has submitted the form. If the user did not submit form, display form for user input. If the user has filled in the form and pressed the submit button, Then, PHP will process the inputs from user.
registration.php
<?php
if(isset($_POST['submit'])){
// process the task as the submit button is pressed
}else{
// Display the form if the submit is not detected.
?>
<form action="process.php" method="get">
Age : <input type="text" name="age" />
<input type="submit" name="submit" />
</form>
<?php
}
?>
registration.php
<?php
if(isset($_POST['submit'])){
// process the task as the submit button is pressed
}else{
// Display the form if the submit is not detected.
?>
<form action="process.php" method="get">
Age : <input type="text" name="age" />
<input type="submit" name="submit" />
</form>
<?php
}
?>
Fundamental of PHP
- PHP code must be enclosed within a block: <?php ……. ?>
- Multiple PHP blocks are allowed in a single document.
- HTML tags can be used within PHP document.
- PHP file can be only executed in web server. It cannot run as a normal HTML file in the local file system.
- End each statement with a semicolon (;)
- Variables start with $ and it is scalable type (no need to declare before used)
- Variable name cannot start with number and it can be any alphanumeric value after the first character.
- echo is function that can print output to browser
- Form is an user interface that accept users input for server to process.
- Form must contains two attributes: action and method. Action attribute specified the script or program that will handle the input. Method is the sending method used (GET or POST). And, a submit button that will do the sending according to these two attributes.
PHP code must be enclosed within a block: <?php ……. ?>
HTML tags do not work within the PHP block. It must use echo function to output them to the browser.
<?php
echo "<H1>Heading Text</H1>";
echo "<P>Paragraph</p>";
?>
<H2>Sub Heading Text</H2>
<p>Paragraph in Sub section</p>
<?php
echo "<H1>Heading Text</H1>";
echo "<P>Paragraph</p>";
?>
<H2>Sub Heading Text 1</H2>
<p>Paragraph in Sub section</p>
<?php
echo "<H2>Sub Heading Text 2</H2>";
echo "<p>Paragraph in Sub section</p>";
?>
<?php
echo "<H1>Heading Text</H1>";
echo "<P>Paragraph</p>";
?>
<H2>Sub Heading Text</H2>
<p>Paragraph in Sub section</p>
Multiple PHP blocks are allowed in a single document.
HTML tags can be used within PHP document.
End each statement with a semicolon (;)
<?php
echo "<H1>Heading Text</H1>";
echo "<P>Paragraph</p>";
?>
<H2>Sub Heading Text 1</H2>
<p>Paragraph in Sub section</p>
<?php
echo "<H2>Sub Heading Text 2</H2>";
echo "<p>Paragraph in Sub section</p>";
?>
Variables start with $ and it is scalable type (no need to declare before used)
Variable name cannot start with number and it can be any alphanumeric value after the first character.
echo is function that can print output to browser
<?php
$B2B = true;
// $1MDB = "News"; <- Invalid variable start with number
$age = 25;
$name = "Johnson";
$years = 3.5;
echo "Name : ".$name."<br />Age : ".$age;
Form is an user interface that accept users input for server to process.
Form must contains two attributes: action and method. Action attribute specified the script or program that will handle the input. Method is the sending method used (GET or POST). And, a submit button that will do the sending according to these two attributes.
<form action="process.php" method="get">
Age : <input type="text" name="age" />
<input type="submit" name="submit" />
</form>
Wednesday, April 25, 2012
Decimal to Binary - JavaScript
The typical way to convert a decimal number to binary number is to divide the decimal number (the dividend) by 2 (the divisor) and the obtained quotient will be pass on and divide by 2 again until the quotient reached 0. Then, the remainder will become the binary number of the decimal number.
From the illustration, the binary of 64 is 1000000 (remainder from bottom to top). The same logic apply to decimal to hexadecimal as well.
Programming is a process of transferring observed logic into computer instructions. With the logic we observed from the above illustration, we can write a JavaScript function:
function dec2bin(num)
{
var dividend = num;
var divisor = 2;
var quotient = dividend;
var remainder;
var binary = [];
while(quotient>0)
{
remainder = quotient%divisor;
quotient = Math.floor(quotient/divisor);
binary.unshift(remainder);
}
return binary.join("");
}
In the function, it accept a decimal number. Then, assign this number to dividend and to quotient as well. We create an iteration statement to loop the process of division until the quotient is 0. The remainders are added into an array called binary. Finally, return the binary value as string to the program.
| Decimal Number : | |
| Binary Number : | |
From the illustration, the binary of 64 is 1000000 (remainder from bottom to top). The same logic apply to decimal to hexadecimal as well.
Programming is a process of transferring observed logic into computer instructions. With the logic we observed from the above illustration, we can write a JavaScript function:
function dec2bin(num)
{
var dividend = num;
var divisor = 2;
var quotient = dividend;
var remainder;
var binary = [];
while(quotient>0)
{
remainder = quotient%divisor;
quotient = Math.floor(quotient/divisor);
binary.unshift(remainder);
}
return binary.join("");
}
In the function, it accept a decimal number. Then, assign this number to dividend and to quotient as well. We create an iteration statement to loop the process of division until the quotient is 0. The remainders are added into an array called binary. Finally, return the binary value as string to the program.
Monday, April 23, 2012
AutoComplete feature in Browser
In order to save your time of typing repeating phrase such as user name, password, search string or some common fields that you often used, browser has include a feature called AutoComplete.
AutoCompete or sometime called AutoFill has been included in HTML 5. However, not all of the browsers supported this feature. For Mozilla Firefox, it is available from version 4 and above. And, Internet Explorer includes this feature from version 5 and above.
In Mozilla FireFox, you may enable the AutoComplete feature by configure the history setting under privacy tab. It is accessible from Tools > Options then select Privacy tab. Under the History block, choose Use custom settings for history option. And make sure you checked the checked box of Remember search and form history.

In Internet Explore, select Tools > Internet Options, then select Content tab. To enable the AutoComplete feature checked the AutoComplete checked box.
If you are using AutoComplete feature in ASP.NET, most likely you would like to enable this feature in your respective browsers.
AutoCompete or sometime called AutoFill has been included in HTML 5. However, not all of the browsers supported this feature. For Mozilla Firefox, it is available from version 4 and above. And, Internet Explorer includes this feature from version 5 and above.
In Mozilla FireFox, you may enable the AutoComplete feature by configure the history setting under privacy tab. It is accessible from Tools > Options then select Privacy tab. Under the History block, choose Use custom settings for history option. And make sure you checked the checked box of Remember search and form history.

In Internet Explore, select Tools > Internet Options, then select Content tab. To enable the AutoComplete feature checked the AutoComplete checked box.
If you are using AutoComplete feature in ASP.NET, most likely you would like to enable this feature in your respective browsers.
ASP.NET vs PHP
It is quite normal that people has confusion between ASP.NET and PHP.
In fact, ASP.NET is a subset of .NET Framework and PHP is a server site
programming language. At the end, they may take part in developing web
application but there are not the same.
 .NET
Framework is a big set of classes and libraries that have been created
for developing all sorts of application; such as Windows Standalone
Application, Dynamic Link Library or Web Application. And, ASP.NET is a
subset of this "big family". ASP.NET contains classes and libraries that
related to web development.
.NET
Framework is a big set of classes and libraries that have been created
for developing all sorts of application; such as Windows Standalone
Application, Dynamic Link Library or Web Application. And, ASP.NET is a
subset of this "big family". ASP.NET contains classes and libraries that
related to web development.
.NET Framework consists of two parts; Framework Class Library and Common Language Runtime. In fact, it is quite similar to JAVA. The concept behind .NET Framework is to build a cross architecture application that will split the process into compiling and running code in two different mode. Let take a look at the JAVA work flow diagram.
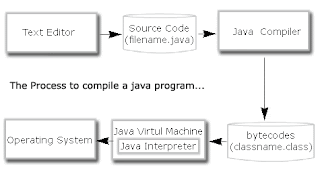 A
JAVA source code with file extension of .java is compiled into a
bytecodes file with file extension of .class. And the .class object file
can be executed by JVM (Java Interpreter). It is a great concept from
JAVA creator to separate the code from the machine. Thus, the task of
communicating with different type of CPU architecture has been passed to
JVM and class file will be able to run on different type of platform
without modifying the source code and re-compilation depend on
architecture is not needed.
A
JAVA source code with file extension of .java is compiled into a
bytecodes file with file extension of .class. And the .class object file
can be executed by JVM (Java Interpreter). It is a great concept from
JAVA creator to separate the code from the machine. Thus, the task of
communicating with different type of CPU architecture has been passed to
JVM and class file will be able to run on different type of platform
without modifying the source code and re-compilation depend on
architecture is not needed.
 In
.NET, the similar concept is adapted in order to achieve this. Let take
a look at the diagram above. It is a typical process of a .NET
workflow. The source code will be compiled into MSIL (Microsoft
Intermediate Language). And upon execution, it will be compiled by JIT
compiler, resided in .NET engine, into a native code that can be
executed by that particular machine.
In
.NET, the similar concept is adapted in order to achieve this. Let take
a look at the diagram above. It is a typical process of a .NET
workflow. The source code will be compiled into MSIL (Microsoft
Intermediate Language). And upon execution, it will be compiled by JIT
compiler, resided in .NET engine, into a native code that can be
executed by that particular machine.
For ASP.NET, the common programming language being used are C# and VB.NET. The source code of these program will be compiled by different language compiler (as C# source code can be only understood by C# compiler) stated in the page directive of the top of the aspx file. This will generate a Intermediate Language file. Then, it will be executed after compile by JIT into a native code.
I hope it will be useful to those person who just wanted to start to learn .NET or ASP.NET development. In short, you may compare C# with ASP.NET vs PHP but not ASP.NET vs PHP.

.NET Framework consists of two parts; Framework Class Library and Common Language Runtime. In fact, it is quite similar to JAVA. The concept behind .NET Framework is to build a cross architecture application that will split the process into compiling and running code in two different mode. Let take a look at the JAVA work flow diagram.


For ASP.NET, the common programming language being used are C# and VB.NET. The source code of these program will be compiled by different language compiler (as C# source code can be only understood by C# compiler) stated in the page directive of the top of the aspx file. This will generate a Intermediate Language file. Then, it will be executed after compile by JIT into a native code.
I hope it will be useful to those person who just wanted to start to learn .NET or ASP.NET development. In short, you may compare C# with ASP.NET vs PHP but not ASP.NET vs PHP.
Subscribe to:
Posts (Atom)